ImageNet
IMAGENET
ImageNet is a dataset of images that are organized according to the WordNet hierarchy. WordNet contains approximately 100,000 phrases and ImageNet has provided around 1000 images on average to illustrate each phrase.
Dataset Statistics
Size 150 GB Number of Records: Total number of images: ~1,500,000; each with multiple bounding boxes and respective class labels
* Total number of non-empty synsets: 21841
* Total number of images: 14,197,122
* Number of images with bounding box annotations: 1,034,908
* Number of synsets with SIFT features: 1000
* Number of images with SIFT features: 1.2 million
References
Samples

Dataset Usage
Download dataset
Tensorflow
Start by cloning the TensorFlow models repo from GitHub. Run the following commands:
git clone https://github.com/tensorflow/models.git

cd models/tutorials/image/imagenet
python classify_image.py
If the model runs correctly, the script will produce the following output:
giant panda, panda, panda bear, coon bear, Ailuropoda melanoleuca (score = 0.88493)
indri, indris, Indri indri, Indri brevicaudatus (score = 0.00878)
lesser panda, red panda, panda, bear cat, cat bear, Ailurus fulgens (score = 0.00317)
custard apple (score = 0.00149)
earthstar (score = 0.00127)
Torch
git clone https://github.com/soumith/imagenet-multiGPU.torch.git
Requirements
- Install torch on a machine with CUDA GPU
- If on Mac OSX, run
brew install coreutils findutilsto get GNU versions ofwc,find, andcut - Download Imagenet-12 dataset from http://image-net.org/download-images . It has 1000 classes and 1.2 million images.
Data processing
The images dont need to be preprocessed or packaged in any database. It is preferred to keep the dataset on an SSD but we have used the data loader comfortably over NFS without loss in speed. We just use a simple convention: SubFolderName == ClassName. So, for example: if you have classes {cat,dog}, cat images go into the folder dataset/cat and dog images go into dataset/dog
The training images for imagenet are already in appropriate subfolders (like n07579787, n07880968). You need to get the validation groundtruth and move the validation images into appropriate subfolders. To do this, download ILSVRC2012_img_train.tar ILSVRC2012_img_val.tar and use the following commands:
# extract train data
mkdir train && mv ILSVRC2012_img_train.tar train/ && cd train
tar -xvf ILSVRC2012_img_train.tar && rm -f ILSVRC2012_img_train.tar
find . -name "*.tar" | while read NAME ; do mkdir -p "${NAME%.tar}"; tar -xvf "${NAME}" -C "${NAME%.tar}"; rm -f "${NAME}"; done
# extract validation data
cd ../ && mkdir val && mv ILSVRC2012_img_val.tar val/ && cd val && tar -xvf ILSVRC2012_img_val.tar
wget -qO- https://raw.githubusercontent.com/soumith/imagenetloader.torch/master/valprep.sh | bash
Now you are all set!
If your imagenet dataset is on HDD or a slow SSD, run this command to resize all the images such that the smaller dimension is 256 and the aspect ratio is intact. This helps with loading the data from disk faster.
find . -name "*.JPEG" | xargs -I {} convert {} -resize "256^>" {}
Running
The training scripts come with several options which can be listed by running the script with the flag –help
th main.lua --help
To run the training, simply run main.lua By default, the script runs 1-GPU AlexNet with the CuDNN backend and 2 data-loader threads.
th main.lua -data [imagenet-folder with train and val folders]
For 2-GPU model parallel AlexNet + CuDNN, you can run it this way:
th main.lua -data [imagenet-folder with train and val folders] -nGPU 2 -backend cudnn -netType alexnet
Similarly, you can switch the backends to ‘cunn’ to use a different set of CUDA kernels.
You can also alternatively train OverFeat using this following command:
th main.lua -data [imagenet-folder with train and val folders] -netType overfeat

# multi-GPU overfeat (let's say 2-GPU)
th main.lua -data [imagenet-folder with train and val folders] -netType overfeat -nGPU 2
The training script prints the current Top-1 and Top-5 error as well as the objective loss at every mini-batch. We hard-coded a learning rate schedule so that AlexNet converges to an error of 42.5% at the end of 53 epochs.
At the end of every epoch, the model is saved to disk (as model_[xx].t7 where xx is the epoch number). You can reload this model into torch at any time using torch.load
model = torch.load('model_10.t7') -- loading back a saved model
Similarly, if you would like to test your model on a new image, you can use testHook from line 103 in donkey.lua to load your image, and send it through the model for predictions. For example:
dofile('donkey.lua')
img = testHook({loadSize}, 'test.jpg')
model = torch.load('model_10.t7')
if img:dim() == 3 then
  img = img:view(1, img:size(1), img:size(2), img:size(3))
end
predictions = model:forward(img:cuda())
If you ever want to reuse this example, and debug your scripts, it is suggested to debug and develop in the single-threaded mode, so that stack traces are printed fully.
th main.lua -nDonkeys 0 [...options...]
Code Description
main.lua(~30 lines) - loads all other files, starts training.opts.lua(~50 lines) - all the command-line options and descriptiondata.lua(~60 lines) - contains the logic to create K threads for parallel data-loading.donkey.lua(~200 lines) - contains the data-loading logic and details. It is run by each data-loader thread. random image cropping, generating 10-crops etc. are in here.model.lua(~80 lines) - creates AlexNet model and criteriontrain.lua(~190 lines) - logic for training the network. we hard-code a learning rate + weight decay schedule that produces good results.test.lua(~120 lines) - logic for testing the network on validation set (including calculating top-1 and top-5 errors)dataset.lua(~430 lines) - a general purpose data loader, mostly derived from here: imagenetloader.torch. That repo has docs and more examples of using this loader.
Theano
Dependencies
How to run
Prepare raw ImageNet data
Download ImageNet dataset and unzip image files.
Preprocess the data
This involves shuffling training images, generating data batches, computing the mean image and generating label files.
Steps
- Set paths in the preprocessing/paths.yaml. Each path is described in this file.
- Run preprocessing/generate_data.sh, which will call 3 python scripts and do all the mentioned steps. It runs for about 1~2 days. For a quick trial of the code, run preprocessing/generate_toy_data.sh, which takes ~10 minutes and proceed.
preprocessing/lists.txt is a static file that lists what files should be created by running generate_data.sh.
Train AlexNet
Set configurations
config.yaml contains common configurations for both the 1-GPU and 2-GPU version.
spec_1gpu.yaml and spec_2gpu.yaml contains different configurations for the 1-GPU and 2-GPU version respectively.
If you changed preprocessing/paths.yaml, make sure you change corresponding paths in config.yaml, spec_1gpu.yaml and spec_2gpu.yaml accordingly.
Start training
1-GPU version, run:
THEANO_FLAGS=mode=FAST_RUN,floatX=float32 python train.py
2-GPU version, run:
THEANO_FLAGS=mode=FAST_RUN,floatX=float32 python train_2gpu.py
Validation error and loss values are stored as weights_dir/val_record.npy
Here we do not set device to gpu in THEANO_FLAGS. Instead, users should control which GPU(s) to use in spec_1gpu.yaml and spec_2gpu.yaml.
Pretrained AlexNet
Pretrained AlexNet weights and configurations can be found at pretrained/alexnet
Caffe
git clone https://github.com/yihui-he/resnet-imagenet-caffe.git
train ResNet on ImageNet with Caffe
All models are trained on 4 GPUs with a minibatch size of 128. Testing is turned off during training due to memory limit(at least 12GB is require). The LMDB data is obtained from the official caffe imagenet tutorial
To train a network, use train.sh. For example, train resnet-50 with gpu 0,1,2,3:
#set caffe path in train.sh
mkdir resnet_50/logs
mkdir resnet_50/snapshot
./train.sh 0,1,2,3 resnet_50 resnet_50_
For better training results, please install my Caffe fork, since the official Caffe ImageData layer doesn’t support original paper’s augmentation (resize shorter side to 256 then crop to 224x224). Use my 224x224 mean image bgr.binaryproto accordingly
See resnet_50/ResNet-50-test.prototxt ImageData layer for details
resnet-50
use resnet_50/ResNet-50-test.prototxt for training and validation
(new) We’ve release a 2X accelerated ResNet-50 caffemodel using channel-pruning
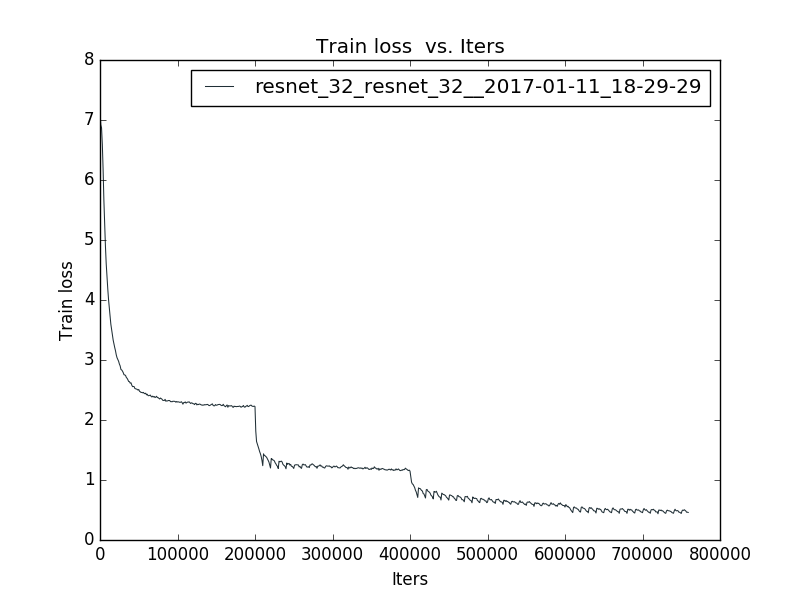
resnet-32
This is a bottleneck architecture,
Since there’s no strong data augmentation and 10-crop test in caffe, the results maybe a bit low.
test accuracy: accuracy@1 = 0.67892, accuracy@5 = 0.88164
training loss for resnet-32 is shown below:
 the trained model is provided in release